Wild Star - Free Scrappy Pattern
- threebirdsandstitc
- Sep 6, 2023
- 3 min read
Updated: Oct 13, 2023

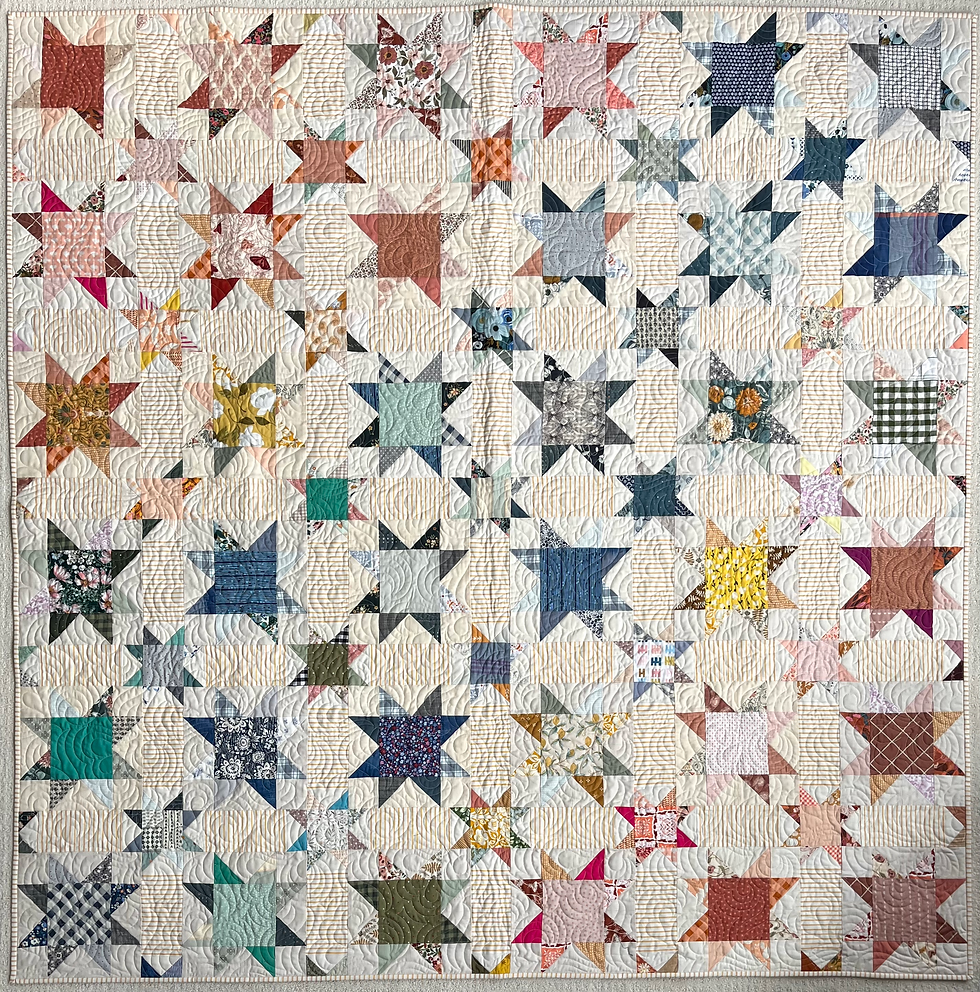
This quilt started out by making a bunch of Stars to help put a bin of pre-cut squares ranging from 2"-6" in size to use. I often take additional small fabrics or scraps from previous projects and cut them down to a manageable and usable size. Once I got all the stars finished, I realized I had a lot of smaller squares ranging in the 2-4" range and decided to use them in the sashing to make smaller stars.
The result was a hit when I posted the quilt on instagram with many asking if there was a pattern for it. So that everyone can help put all those fabric scraps to use I have written a downloadable PDF pattern for it that you can access here.
Click the download link to the right to access WILD STAR PATTERN
Please read through before starting. I have given some quick tips on how to make each step of the quilt.
WILD STAR QUILT:
If you want to make this quilt and plan to use a variety of scraps like I did then I would start by organizing all your scraps by color and then create a layout based on what you have the most of. I did however put yardage for FQ's and F8ths with a cutting diagram in the downloadable pattern if you would prefer to pull from your stash and build a bundle to use.
BIG STARS:
To start I made a bunch of warm color toned big stars, as I refer to them in the pattern, since I had a majority of that in my scrap bin. Then I added in cooler toned stars using blues, aqua's and greens. I did make a few extra big stars and swapped them as I started to layout the big stars.
To prevent the stars from looking chaotic / busy I did limit each star to 5 fabric prints, 1 print for the center square and 4 prints used on the star points. I repeated this as well for the smaller stars in the sashing. However, you will notice below when laying out the star points, I didn't place the same color / print in the opposite side of the star for each fabric. I did vary a few of the fabric placements. You will see in the photos below...

Once all the Big Stars are done create a 6 x 6 grid layout with your finished 36 stars measuring 9.5" square.
SASHING FABRIC:
Originally, I had planned to make the sashing scrappy too, using a variety of fabrics in the same colors as the adjoining big stars. However, once I finished all the big stars I opted for a subtle basic blender print instead for consistency. I used a Riley Blake yellow ticking stripe from the With a Flourish collection for Simple Simon and Company. Some other great fabric collections to look at are, Riley Blacks Liberty Belle or Wiltshire collections, Cotton and Steels Basic collection and for Dear Stella Moonscape, Jax or Dash Flow collections.
SMALL STARS +SASHING:
To make the little star sashing I would first layout all the rows and then choose the fabrics for each the small stars. I used the four big stars as a guide to help flow the fabrics, so they coincided with the quilts warm to cool to warm flow. I then took it row by row making all the flying geese units and connecting them to the yellow stripe sashing until all the vertical and horizonal sashing blocks were completed.

: If you decide to batch make your sashing blocks, be careful not to mix the fabrics up. I made each sashing block and placed it back where it would go on my design wall before moving on to the next one to avoid the seam ripper.
I hope you enjoy making this quilt as much as I did. I will certainly be making this again. I'd love to say this reduced down my scrap bin, but I still have lots left.

For the quilting design I chose Calliope to keep the quilting texture soft and flowing.
*This is a free pattern and although I did read through the pattern, it was not tested. Please email me if you notice any pattern errors or have questions.


Comments